
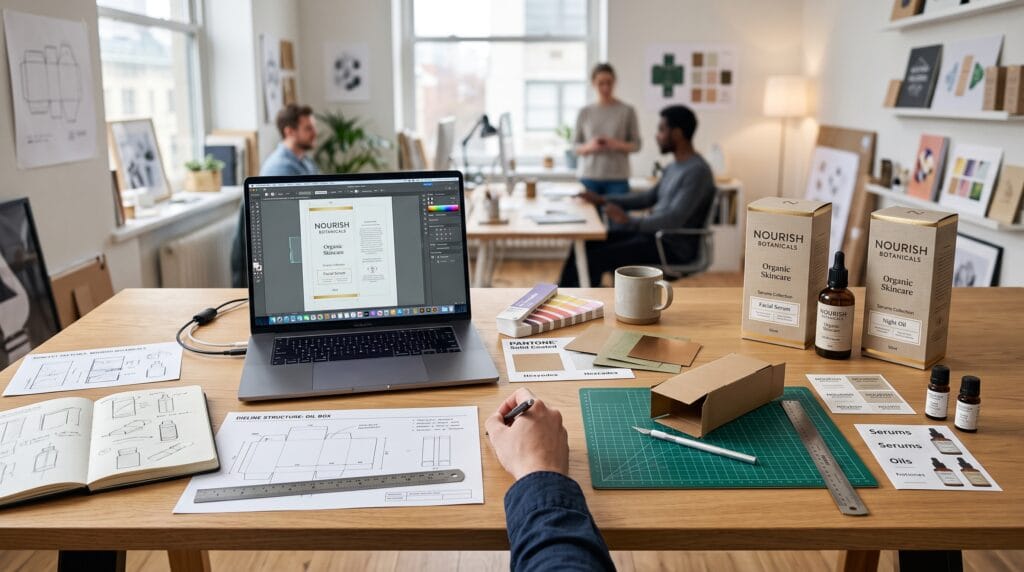
A professional packaging design workflow helps designers move from an initial client brief to a production-ready package without losing control of strategy, creativity, technical details, or deadlines. Packaging projects involve more than creating attractive artwork. Designers must consider the product, audience, materials, structure, typography, legal information, printing limitations, and the way the package will appear both on shelves and online.
Without a clear process, revisions can become confusing, dielines may change late in the project, and production mistakes can appear after artwork has already been approved.
A consistent packaging design workflow gives both designers and clients a clearer understanding of what happens at each stage. It also makes it easier to identify problems early, manage feedback, and prepare accurate files for printers or packaging manufacturers.
This guide walks through a practical workflow that designers can adapt for food, cosmetics, beverages, retail products, ecommerce packaging, and other commercial projects.
Why a Packaging Design Workflow Matters
Packaging design combines branding with production.
A logo can often be adjusted relatively easily after presentation, but packaging may involve printed cartons, labels, containers, coatings, foils, windows, embossing, and custom structures. Errors can become expensive once production begins.
A strong packaging design workflow can help designers:
- Understand client expectations
- Organize project information
- Research competitors
- Develop stronger concepts
- Coordinate with suppliers
- Work accurately with dielines
- Manage revisions
- Reduce production mistakes
- Prepare print-ready artwork
- Deliver more professional client projects
The workflow should remain flexible because every project is different. However, having a repeatable structure prevents important steps from being forgotten.
1. Start the Packaging Design Workflow With a Client Brief
The first stage is understanding what the client actually needs.
Do not begin designing from only the product name and a few reference images.
Collect information about:
- Product type
- Target audience
- Price positioning
- Sales channels
- Competitors
- Brand personality
- Packaging format
- Required sizes
- Launch date
- Printing budget
- Sustainability goals
Ask whether the product will primarily appear in retail stores, ecommerce listings, direct-to-consumer shipping, or all three.
These environments create different design requirements.
Clarify the Project Deliverables
Define what you are responsible for delivering.
The project might include:
- Primary packaging
- Secondary packaging
- Labels
- Multiple flavors
- Shipping boxes
- Inserts
- Mockups
- Print-ready artwork
Clear deliverables prevent scope confusion later.
2. Collect Technical Packaging Information Early
Technical information should be collected before serious design work begins.
Ask the client or supplier for:
- Final dimensions
- Dielines
- Material specifications
- Printing method
- Number of colors
- Special finishes
- Bleed requirements
- Safe zones
- Barcode dimensions
- Required legal information
If a dieline is not available, determine who will create it.
Usually, the packaging manufacturer or structural designer should provide the approved production dieline.
A professional packaging design workflow avoids guessing technical specifications.
3. Research the Market and Competitors
Before creating concepts, understand the visual environment where the product will compete.
Review similar products and identify patterns.
Look at:
- Color palettes
- Typography
- Product naming
- Photography
- Illustration
- Packaging structures
- Information hierarchy
- Claims and benefits
- Price positioning
The goal is not to imitate competitors.
Research helps identify what customers already expect and where opportunities exist for differentiation.
Look for Visual Gaps
If every competitor uses green packaging, another color direction may help a product stand out.
If competitors rely on busy imagery, a cleaner design might create stronger contrast.
Strategic differentiation is more useful than being different without a reason.
4. Define the Packaging Strategy
Before visual exploration, summarize what the package should communicate.
A strategy might define the product as:
- Premium and sophisticated
- Natural and organic
- Affordable and friendly
- Bold and youthful
- Scientific and trustworthy
- Handmade and artisanal
This strategic direction becomes a filter for later design decisions.
The packaging design workflow becomes much easier when the team agrees on what the package should feel like before discussing individual fonts or colors.
5. Build a Visual Direction
Create a mood board or visual reference board.
Include examples of:
- Typography
- Colors
- Photography
- Illustration
- Materials
- Finishes
- Layout
- Packaging structures
Avoid creating a board filled only with direct competitors.
Include inspiration from editorial design, architecture, fashion, photography, signage, or other fields when relevant.
The goal is to establish a visual atmosphere.
Keep the Direction Focused
Three clearly different directions are usually more useful than ten slightly different mood boards.
Each direction should have a recognizable personality and strategic reason.
6. Sketch Packaging Concepts
Sketching allows designers to explore ideas quickly before committing to polished digital artwork.
You can explore:
- Logo placement
- Product name hierarchy
- Windows
- Illustration placement
- Label shapes
- Front-panel balance
- Side-panel content
Sketches do not need to look beautiful.
Their purpose is to test composition and ideas.
Even simple thumbnail drawings can save time later.
Sketching is an important stage in a packaging design workflow because it encourages exploration without becoming attached to one polished concept too early.
7. Establish the Information Hierarchy
Packaging usually contains more information than most other branding applications.
Determine what customers should notice first.
A common hierarchy might be:
- Brand name
- Product name
- Product category
- Main benefit
- Flavor or variant
- Net weight
Supporting information can appear on side or back panels.
This may include:
- Ingredients
- Directions
- Nutrition information
- Warnings
- Contact details
- Recycling instructions
Good hierarchy helps customers understand the package quickly.
8. Develop Typography for the Packaging Design Workflow
Typography plays both a branding and functional role.
Choose fonts for:
- Brand name
- Product name
- Descriptions
- Ingredients
- Instructions
- Legal text
Decorative typography can create personality, but small information needs excellent readability.
Test Actual Packaging Size
Do not evaluate typography only while zoomed in on a large monitor.
Print the design at actual size.
Text that looks comfortable at 200% zoom may become difficult to read once printed.
Always verify minimum sizes with production requirements where applicable.
9. Build a Practical Color System
Color can differentiate product variants and strengthen recognition.
A multi-product system might use one core brand palette and assign a secondary color to each flavor.
For example:
- Yellow for lemon
- Purple for berry
- Green for mint
- Orange for citrus
However, color should support clear labeling rather than replace it.
Remember that screen colors may not reproduce exactly in print.
A professional packaging design workflow considers CMYK, spot colors, substrate color, and printing method.
Also Read: Packaging Design Tips You Should Know for Better Results
10. Apply Artwork to the Approved Dieline
Once the direction is established, begin working on the actual dieline.
A dieline typically indicates:
- Cut lines
- Fold lines
- Bleed areas
- Glue areas
- Panels
- Safe zones
Keep dieline elements on separate locked layers whenever possible.
Do not accidentally modify structural dimensions.
Confirm Panel Orientation
Fold the dieline mentally or create a paper prototype.
It is surprisingly easy to place side-panel text upside down or position artwork incorrectly when viewing a flattened structure.
Physical prototypes make orientation problems easier to detect.
11. Create Realistic Packaging Mockups
Mockups help clients understand how flat artwork becomes a physical product.
They can reveal issues with:
- Hierarchy
- Scale
- Panel visibility
- Color
- Logo placement
- Shelf impact
Use mockups to present the design, but do not judge production accuracy from mockups alone.
A beautiful 3D render cannot confirm whether bleed, barcode size, or print separations are correct.
Mockups and technical artwork serve different purposes within the packaging design workflow.
12. Present Packaging Concepts Professionally
Avoid emailing isolated JPG files without context.
Create a presentation that explains:
- Project objective
- Strategic direction
- Concept rationale
- Typography
- Color system
- Front panel
- Side panels
- Mockups
- Product variations
Show enough information for the client to evaluate the system.
Explain the Reasoning
Do not simply say:
“Here is concept one.”
Explain why the concept supports the target audience and brand position.
This shifts feedback from personal taste toward business objectives.
13. Manage Client Feedback Clearly
Feedback should be collected in an organized way.
Ask one primary decision-maker to consolidate comments when possible.
Scattered feedback from emails, messaging apps, calls, and different stakeholders can create confusion.
Separate feedback into:
- Strategic changes
- Visual changes
- Content corrections
- Technical revisions
Good revision management is a major part of a professional packaging design workflow.
14. Control the Number of Revisions
Define revision terms before the project begins.
For example, a project may include two or three rounds of revisions.
This does not mean ignoring legitimate production corrections later.
The goal is to distinguish between normal refinement and major changes in direction.
If the client changes the product positioning after approval, that may require additional scope.
Clear boundaries protect both the designer and client.
15. Verify All Packaging Content
Before preparing final artwork, review every piece of information carefully.
Check:
- Product name
- Flavor
- Ingredients
- Weight
- Contact information
- Website
- Barcode
- Warnings
- Instructions
- Legal claims
Designers should not invent regulatory content.
The client should provide and approve required product information.
For regulated industries, the client should confirm compliance with relevant professionals or authorities.
16. Check Barcodes and QR Codes
Barcodes need enough clear space and appropriate contrast.
Do not distort or decorate them.
QR codes should also remain large enough and clear enough to scan.
Test printed versions using multiple devices where possible.
Avoid placing codes across folds, curves, textured areas, or highly reflective finishes unless the supplier confirms reliability.
17. Prepare the Packaging Design for Prepress
Prepress is the stage where creative artwork becomes technically ready for production.
Your checklist may include:
- Correct color mode
- Proper bleed
- Image resolution
- Linked images
- Font handling
- Overprint settings
- Spot colors
- Dieline layers
- Knockouts
- Transparency
Requirements vary depending on printing method and supplier.
Never assume that settings from one printer apply to another.
A reliable packaging design workflow includes direct communication with production partners.
18. Check Images and Resolution
Raster images should have sufficient effective resolution at final print size.
Large images copied from websites may look acceptable on screen but reproduce poorly.
Inspect:
- Effective DPI
- Color profile
- Cropping
- Sharpness
- Compression artifacts
Also verify licensing for all photography, illustrations, fonts, and other creative assets.
Production files should not contain temporary or unlicensed content.
19. Review Special Printing Finishes
Packaging may use premium finishes such as:
- Foil stamping
- Spot UV
- Embossing
- Debossing
- Metallic inks
- White ink
- Varnish
- Die-cut windows
These effects usually require dedicated layers or spot colors in production artwork.
Label them clearly according to supplier instructions.
Do not rely only on a mockup to communicate finishing intent.
The printer needs technically accurate artwork.
Also Read: How to Create a Memorable Unboxing Experience for Your Brand
20. Build a Physical Prototype
Whenever possible, print and assemble a prototype at actual size.
Even a basic desktop print can reveal:
- Tiny text
- Weak hierarchy
- Incorrect panel orientation
- Awkward folds
- Missing content
- Misaligned artwork
Hold the package in your hands.
Look at it from the angles customers will see.
Physical testing remains one of the most valuable stages in the packaging design workflow.
21. Test Shelf and Ecommerce Visibility
Packaging may need to perform both physically and digitally.
For retail, test the package beside competitors.
Ask:
- Does the brand stand out?
- Is the product category clear?
- Can the name be read from a distance?
For ecommerce, shrink the product image to thumbnail size.
Important branding and variant information should remain recognizable.
A design that works on a shelf may require different considerations for an online storefront.
22. Prepare Client Approval
Before sending production files, obtain written approval of the final design.
The approval version should clearly show:
- Final artwork
- Correct product variation
- Approved copy
- Colors
- Structure
- Finishes
Keep an organized record of approval.
This protects the workflow from uncertainty if questions arise later.
23. Create Production-Ready Files
Package production files according to supplier requirements.
Files may include:
- Illustrator artwork
- Print-ready PDF
- Linked images
- Font information
- Finish separations
- Color specifications
Use clear filenames.
For example:
Brand_Product_Flavor_Box_Final_Production_v1.pdf
Avoid confusing filenames such as:
FINAL_final_NEW2_revised.pdf
Professional file organization is a small detail that makes a packaging design workflow feel far more controlled.
24. Review Printer Proofs
Whenever possible, review a proof before full production.
A proof may reveal:
- Color differences
- Registration issues
- Fine-line problems
- Text readability
- Image quality
Digital proofs may not perfectly reproduce every material or finishing effect.
For important projects, physical proofs or production samples can provide greater confidence.
Do not approve a proof casually.
Compare it with the approved design carefully.
25. Review the First Production Run
The workflow should not end when files are sent.
Ask to review samples from the first production run when possible.
Inspect:
- Printing
- Cutting
- Folding
- Glue
- Alignment
- Color
- Finishes
- Material quality
Document any issues for future runs.
Production feedback can improve future packaging design workflow decisions and strengthen your technical knowledge as a designer.
Helpful Tools for Packaging Design Workflow
Different tools can support specific stages of packaging development.
Adobe Illustrator
Illustrator is one of the most useful tools for packaging artwork.
It can be used for:
- Dielines
- Vector graphics
- Labels
- Typography
- Spot colors
- Production artwork
Adobe Photoshop
Photoshop is useful for image editing, texture creation, photo retouching, and realistic packaging mockups.
Adobe InDesign
InDesign can help with projects that contain extensive text or require structured multi-page brand and packaging presentations.
Pacdora
Pacdora provides packaging templates, dielines, and 3D mockup tools that can speed up early visualization.
Always verify templates with the final packaging supplier before production.
Esko ArtiosCAD
ArtiosCAD is used for more advanced structural packaging development, particularly custom cartons and production-focused packaging engineering.
Blender
Blender can create custom 3D packaging visualizations and realistic product scenes.
It is especially useful when standard mockups do not match a unique package structure.
Figma
Figma can help organize packaging presentations, design systems, review screens, and collaborative feedback.
Notion or Trello
Project management tools can help designers organize:
- Briefs
- Deadlines
- Client feedback
- Approval status
- Production notes
The best software supports the packaging design workflow rather than creating additional complexity.
Common Packaging Design Workflow Mistakes
Designing Before Receiving a Final Dieline
Late structural changes can require extensive artwork revisions.
Ignoring Printing Limitations
Not every effect visible on screen can be reproduced economically.
Presenting Too Many Concepts
Too many options can make decisions harder.
Skipping Actual-Size Testing
Always print the design at realistic dimensions.
Using Unapproved Copy
Product claims and regulated information should come from the client.
Mixing Feedback From Multiple Sources
Centralize revisions whenever possible.
Sending Files Without Production Checks
Never assume a visually finished design is technically print-ready.
Losing Version Control
Use clear filenames and archive old versions.
Packaging Design Workflow Checklist
Before completing a packaging project, confirm that:
- The client brief is complete.
- Target customers are clearly defined.
- Competitor research has been completed.
- Brand positioning is understood.
- Final dielines are approved.
- Technical specifications are confirmed.
- Information hierarchy is clear.
- Typography works at actual size.
- Colors are production appropriate.
- Artwork has sufficient bleed.
- Images have adequate resolution.
- Barcodes and QR codes have been tested.
- Legal copy is client-approved.
- Special finishes are separated correctly.
- Mockups reflect the approved design.
- A physical prototype has been reviewed.
- Client approval is documented.
- Production files are clearly organized.
- Printer proofs are checked carefully.
- Final production samples are reviewed.
Also Read: Packaging Design Mockup Templates That Look Professional
Final Thoughts
A professional packaging design workflow creates a bridge between creative ideas and successful production.
Start with a detailed brief, gather technical information early, and research the market before developing visual directions. Establish hierarchy and branding before applying artwork to the final dieline.
Use mockups to communicate ideas, but always test designs at actual size.
As the project progresses, manage feedback carefully, verify all content, prepare files according to printer specifications, and review proofs before production.
The strongest packaging projects are not simply visually attractive. They are strategically clear, technically accurate, practical to manufacture, and easy for customers to understand.
A repeatable packaging design workflow also makes client relationships smoother because expectations, approvals, revisions, and deliverables become easier to manage.
By combining research, design thinking, typography, structural awareness, prepress knowledge, and production testing, designers can reduce mistakes and deliver packaging that performs well from the first presentation to the final printed product.
For high-quality fonts to boost your income, check out Letter Crafted. Our professional fonts are perfect for branding, marketing, and content creation. So, don’t miss this opportunity.