
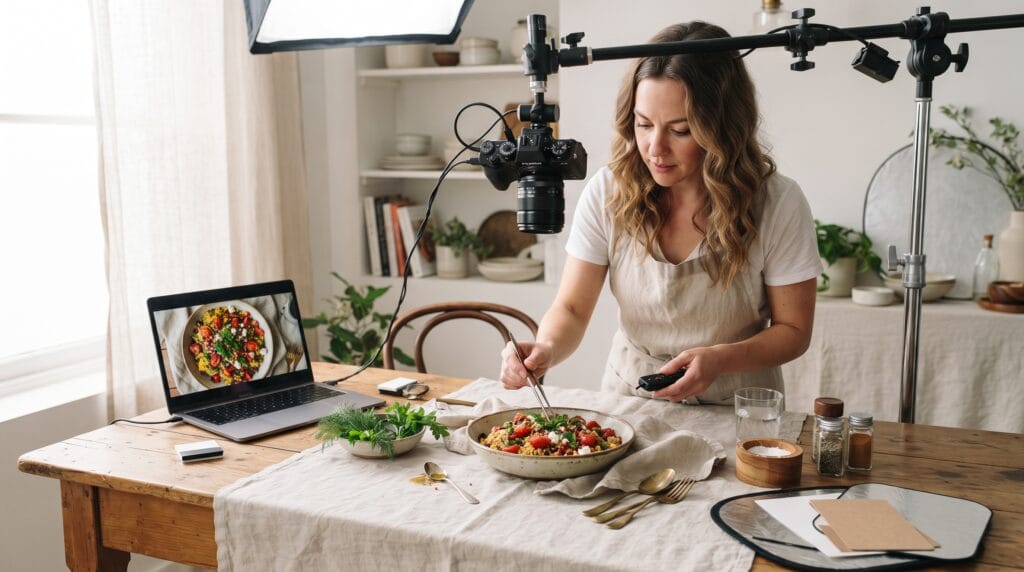
A practical food photography tutorial can help creators turn ordinary meals into polished, appetizing images that look professional on blogs, Instagram, restaurant menus, recipe websites, and portfolios. Great food photography is not only about having an expensive camera. Lighting, composition, styling, color, angles, and editing often have a much bigger impact on the final image.
Food photography can look simple because the subject does not move, but small details matter. A plate may look delicious in person yet appear flat or unappealing in a photo.
The goal is to make viewers imagine the taste, texture, temperature, and freshness of the food.
This food photography tutorial covers the essential techniques creators can use to improve their images, whether they are shooting with a smartphone, mirrorless camera, or DSLR.
Why Food Photography Matters for Creators
Food is highly visual.
People often decide whether something looks appetizing before reading the recipe or description.
Strong photography can help creators:
- Increase engagement on social media
- Improve blog presentation
- Make recipes more appealing
- Build a stronger portfolio
- Create better restaurant content
- Promote food products
- Improve sponsored posts
- Develop a recognizable visual style
A good image communicates more than the appearance of the dish.
It can communicate warmth, freshness, comfort, luxury, simplicity, or celebration.
Learning the principles in this food photography tutorial helps creators control those impressions rather than relying on luck.
Food Photography Tutorial – Start With Good Lighting
Lighting is one of the most important parts of food photography.
Even beautifully styled food can look unappealing under poor light.
Use Natural Window Light
For beginners, natural window light is usually the easiest option.
Place the food close to a large window and turn off unnecessary indoor lights.
Mixed lighting can create strange color casts.
Soft daylight tends to make food look:
- Natural
- Fresh
- Dimensional
- Colorful
- Appetizing
Avoid direct midday sunlight unless you intentionally want strong shadows.
A thin curtain can soften harsh sunlight.
Try Side Lighting
Side lighting means the light comes from one side of the food.
This is an excellent setup for showing:
- Texture
- Layers
- Steam
- Sauces
- Crumbs
- Glossy surfaces
Place the window to the left or right of your subject.
Then photograph from the front or slightly above.
Experiment With Backlighting
Backlighting means the main light comes from behind the food.
It works especially well for:
- Drinks
- Soups
- Syrups
- Glassware
- Steam
- Translucent ingredients
Backlighting can create beautiful highlights and make food appear more dimensional.
Use a white board opposite the light source if the front becomes too dark.
Use Reflectors and Flags
You do not need expensive lighting accessories.
A piece of white foam board can act as a reflector.
Place it opposite the window to bounce light back onto the food.
This reduces harsh shadows.
A black board can do the opposite.
It absorbs light and creates deeper shadows, which can produce a dramatic or moody style.
In this food photography tutorial, the important idea is to control light intentionally instead of simply placing food wherever light happens to be available.
Choose the Right Background
Backgrounds influence the mood of the image.
Common food photography backgrounds include:
- White surfaces
- Marble
- Wood
- Concrete textures
- Neutral fabric
- Dark stone
- Matte boards
- Kitchen counters
Simple backgrounds usually work best.
A busy surface can compete with the food.
Try to choose colors and textures that support the dish.
For example, rustic bread may look natural on wood, while elegant desserts might work well on marble or a clean neutral surface.
Food Photography Tutorial for Better Food Styling
Food styling is about arranging food so it photographs well.
The goal is not always perfect symmetry.
Small imperfections often make a dish look more natural.
Keep Food Fresh
Photograph food as soon as possible after preparation.
Fresh food has:
- Better color
- Better texture
- More moisture
- More shine
- Stronger visual appeal
Some foods lose their appearance quickly.
Ice cream melts, herbs wilt, sauces dry, and fried foods lose crispness.
Plan the scene before the final dish arrives.
Add Garnishes Carefully
Garnishes can provide color and texture.
Useful examples include:
- Fresh herbs
- Seeds
- Spices
- Fruit slices
- Powdered sugar
- Chocolate shavings
- Olive oil
- Crumbs
However, do not add ingredients that would not realistically belong in the dish.
The image should still feel believable.
Show Texture
Texture makes food feel more appetizing.
Instead of photographing a perfect cake, cut a slice.
Instead of showing an untouched bowl of pasta, lift a few noodles with a fork.
You can also:
- Break bread open
- Pour sauce
- Sprinkle toppings
- Cut fruit
- Show layers
- Add crumbs
These small actions create visual interest.
Choose the Best Camera Angle
There is no single correct camera angle for every dish.
The best angle depends on the shape and important features of the food.
Overhead Photography
Photograph directly above the dish.
This angle works well for:
- Pizza
- Flat lays
- Breakfast tables
- Salads
- Bowls
- Multiple dishes
- Ingredient layouts
Overhead photography emphasizes shapes and arrangement.
45-Degree Angle
A 45-degree angle resembles the way people often see food while sitting at a table.
It works well for:
- Pasta
- Breakfast dishes
- Cakes
- Bowls
- Restaurant meals
It allows viewers to see both the top and side of the food.
Eye-Level Photography
Photograph at approximately the same height as the food.
This works especially well for:
- Burgers
- Layer cakes
- Sandwiches
- Pancake stacks
- Tall drinks
Eye-level images emphasize height and layers.
Experiment before deciding which angle best tells the story.
Food Photography Tutorial to Improve Composition
Composition controls how visual elements are arranged inside the frame.
A strong composition directs attention toward the main dish.
Use the Rule of Thirds
Imagine dividing the frame into nine equal sections.
Place important elements near the intersection points.
The food does not always need to sit directly in the center.
Off-center placement can make the image feel more dynamic.
Use Leading Lines
Leading lines guide the viewer’s eyes toward the subject.
They can be created using:
- Cutlery
- Napkins
- Table edges
- Ingredients
- Plates
- Serving boards
These elements should support the main food rather than distract from it.
Leave Negative Space
Negative space is an empty or simple area around the subject.
It can make an image feel cleaner and more professional.
It is especially useful if the image will later include:
- Text
- Recipe titles
- Advertising copy
- Social media graphics
Do not feel obligated to fill every corner of the frame.
Also Read: Simple Photo Editing Tutorial for Clean and Aesthetic Photos
Select Props With Restraint
Props help create context.
Useful food photography props include:
- Plates
- Bowls
- Forks
- Spoons
- Napkins
- Cutting boards
- Cups
- Ingredients
However, too many props make compositions confusing.
Every object should have a reason to be present.
If a prop does not improve the story, remove it.
This is one of the simplest lessons in any food photography tutorial.
Choose Colors Intentionally
Color plays an important role in food photography.
Consider how the food, background, plate, and props interact.
Complementary colors can create contrast.
For example:
- Red food with green herbs
- Orange dishes with blue-gray backgrounds
- Purple ingredients with yellow details
Neutral backgrounds can help colorful food stand out.
For soft lifestyle content, use warm creams, beige, muted greens, and natural wood.
For premium or dramatic images, dark backgrounds may work better.
Camera Settings for Food Photography
If you use a DSLR or mirrorless camera, manual settings give you more control.
Aperture
A wider aperture such as f/2.8 or f/4 can create a shallow depth of field.
This makes the subject sharp while softly blurring the background.
For overhead images where multiple objects need to remain sharp, use a narrower aperture such as f/5.6 or f/8.
ISO
Keep ISO as low as possible to reduce digital noise.
Values such as ISO 100 or 200 are ideal when enough light is available.
Increase ISO when necessary, but avoid pushing it too high if image quality is important.
Shutter Speed
When using a tripod, slower shutter speeds are possible.
When shooting handheld, use a faster shutter speed to reduce motion blur.
For pouring sauces, sprinkling sugar, or capturing movement, faster shutter speeds can freeze action.
Food Photography Tutorial for Smartphone Creators
You do not need a professional camera to create strong food photography.
Modern smartphones can produce excellent results.
Use these techniques:
- Clean the camera lens
- Use the main camera rather than digital zoom
- Tap the food to focus
- Adjust exposure manually
- Avoid built-in flash
- Use window light
- Keep the phone steady
- Try several angles
If available, shoot in RAW or a high-quality format for more editing flexibility.
Smartphone creators should pay special attention to lighting and composition because those factors matter more than expensive equipment.
Use a Tripod When Possible
A tripod improves consistency.
It is especially useful for:
- Overhead photography
- Long exposures
- Video
- Reels
- Stop-motion content
- Self-shooting
- Repeating compositions
Using a tripod also allows you to adjust the food without changing the camera position.
For smartphone creators, inexpensive phone tripods can be enough.
Capture Movement and Human Interaction
Food photography becomes more engaging when something is happening.
Try capturing:
- Pouring coffee
- Cutting cake
- Drizzling sauce
- Sprinkling herbs
- Holding a plate
- Lifting noodles
- Breaking bread
- Serving food
Hands can add a human element without requiring a full portrait.
Movement also creates a stronger sense of freshness and immediacy.
Food Photography Tutorial for Creating a Story
A strong food image can tell a small story.
Instead of photographing only a finished dish, think about the moment around it.
Is it:
- A quiet breakfast?
- A family dinner?
- A luxury restaurant experience?
- A summer picnic?
- A cozy winter dessert?
- A fresh healthy lunch?
Choose lighting, colors, props, and composition based on the mood.
A rustic breakfast might include soft window light, linen, wood, and warm tones.
A luxury dessert could use dark backgrounds, refined tableware, and controlled highlights.
Storytelling helps creators develop a recognizable visual identity.
Also Read: Social Media Design Tutorial with Simple Tips and Examples
Shoot Multiple Variations
Do not take only one photo.
Capture:
- Wide shots
- Medium shots
- Close-ups
- Overhead views
- Side views
- Detail shots
- Horizontal images
- Vertical images
Different formats are useful for different platforms.
Vertical photos work well for Pinterest, Stories, and Reels covers.
Horizontal images may be more suitable for websites and blog headers.
Square and portrait crops often work well on Instagram.
This approach makes a single shoot much more productive.
Editing Food Photography
Editing should improve the image without making food look unnatural.
Basic adjustments may include:
- Exposure
- Contrast
- Highlights
- Shadows
- White balance
- Saturation
- Texture
- Sharpness
- Crop
Be careful with saturation.
Increasing color too aggressively can make food look artificial.
White balance is particularly important.
Food often appears more appetizing when skin tones, plates, and neutral backgrounds remain accurate.
Helpful Tools for Food Photography Creators
Adobe Lightroom
Useful for color correction, exposure adjustments, cropping, presets, and batch editing.
Adobe Photoshop
Helpful for more detailed retouching, cleanup, compositing, and removing distracting objects.
Capture One
A strong option for professional photographers who want advanced color control and tethered shooting.
Snapseed
A practical mobile editing app for quick exposure, color, and detail adjustments.
VSCO
Useful for creators who want consistent visual styles and simple preset-based editing.
Canva
Helpful when food photos need to become social posts, recipe graphics, menus, or promotional content.
Build a Consistent Editing Style
Creators often benefit from consistent photography.
Instead of changing the editing style for every post, develop a recognizable look.
You might choose:
- Bright and airy
- Dark and moody
- Warm and rustic
- Clean and minimal
- Colorful and vibrant
- Natural and editorial
Consistency helps a blog, Instagram feed, or portfolio feel more professional.
Presets can help, but they should not be applied blindly.
Different lighting conditions may require individual adjustments.
Common Food Photography Mistakes
Using Harsh Indoor Lighting
Strong overhead lights can create unpleasant shadows and color casts.
Use window light or controlled artificial light instead.
Using Built-In Flash
Direct flash often makes food look flat and shiny.
Avoid it unless you intentionally want a direct-flash aesthetic.
Adding Too Many Props
Props should support the food, not compete with it.
Ignoring the Background
Check the entire frame before shooting.
Remove distracting objects.
Photographing Food Too Late
Some dishes lose their visual appeal quickly.
Prepare the composition before the food is ready.
Oversaturating During Editing
Food should look delicious but believable.
Choosing the Wrong Angle
A flat pizza may look better overhead, while a layered burger may look stronger from the side.
Forgetting Small Details
Clean plate edges, remove unwanted spills, straighten cutlery, and check crumbs before shooting.
Food Photography Tutorial Checklist
Before taking the final shot, check:
- Is the food fresh?
- Is the main light soft and controlled?
- Have unnecessary indoor lights been turned off?
- Is the background clean?
- Does the camera angle suit the dish?
- Is the composition balanced?
- Are props supporting the subject?
- Are colors working together?
- Is the main subject in focus?
- Is the exposure correct?
- Are plate edges clean?
- Have you captured vertical and horizontal versions?
- Did you photograph close-up details?
- Is there enough negative space when needed?
- Does the image communicate the intended mood?
Practice With Simple Food Photography Projects
The easiest way to improve is to practice regularly.
Try photographing:
Coffee
Experiment with steam, backlighting, and hands holding the cup.
Pancakes
Use eye-level photography to show layers.
Add syrup or fruit for movement and color.
Salad
Try overhead photography to emphasize shapes and fresh ingredients.
Cake
Photograph the full cake, then cut a slice to reveal the interior.
Pasta
Experiment with a 45-degree angle and capture a fork lifting noodles.
Fresh Fruit
Use strong color contrast and simple backgrounds.
Repeating these exercises helps you understand how different foods respond to light and composition.
Develop Your Own Food Photography Style
Technical knowledge is important, but style is what makes your work recognizable.
Study photographs you admire and identify what attracts you.
Ask:
- Is the lighting soft or dramatic?
- Are the colors warm or cool?
- Are compositions minimal or busy?
- Are backgrounds light or dark?
- Is the food perfectly styled or intentionally natural?
Then experiment instead of copying exactly.
Over time, repeated choices will form your personal style.
Also Read: How to Make a Poster Design That Looks Eye-Catching
Final Thoughts
A strong food photography tutorial should teach more than camera settings.
Great food images come from understanding light, styling, composition, texture, color, storytelling, and timing.
Start with simple natural light.
Choose a clean background.
Style the food carefully without making it look artificial.
Experiment with overhead, 45-degree, and eye-level angles.
Then refine the final image through thoughtful editing.
Creators do not need a large studio or expensive equipment to improve.
A window, simple reflector, smartphone or camera, and careful attention to composition can already produce impressive results.
Most importantly, practice consistently.
Photograph the same dish from several angles. Change the lighting. Remove props. Add movement. Compare the results.
The more you experiment with the principles in this food photography tutorial, the easier it becomes to recognize what makes food look appetizing on camera.
Eventually, lighting and composition decisions become more intuitive.
That is when your food photography begins to develop not only better technical quality, but also a visual style that viewers can recognize as your own.
For high-quality fonts to boost your income, check out Letter Crafted. Our professional fonts are perfect for branding, marketing, and content creation. So, don’t miss this opportunity.